Standard Autosampler Dashboard Panel
Module Graphic
The items in the standard autosampler graphic have the following meaning and function (items displayed depend on module type and configuration):
| Displayed during an injector program, either internal or from the injector program/pretreatment table. The highlight moves during the injection. At the end of the run, the icon is removed. | |
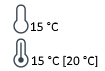
| Displays the status of the sample thermostat. This graphic is available only when a sample thermostat is installed.
| |
| Indicates that an External Contacts board is installed. | |
|
| The syringe graphic shows a representation of the flowpath
|
| Denotes an injection from a vial. The current sample location is shown to the right of the graphic. The tooltip displays the current tray configuration. | |


Actuals
The following standard autosampler actuals are displayed:
Injection Volume | The volume of the last injection (in µL). |
Sample Location | The location of the last sample. |
Temperature | The sample thermostat temperature (in ° C). This actual is present only if a sample thermostat is installed. |
Context Menu
The context menu contains the following commands (available commands depend on module type and configuration):
| Control | Displays the sampler's Control dialog box. |
| Method | Displays the sampler's Method Setup dialog box. |
| Injector Program | Displays the sampler's Injector Program. |
| Error Method |
|
| Identify Device | Causes the LED on the front of the module to blink for a few seconds. |
| Home Arm | Moves the gripper arm to its home position to allow you to remove the tray. |
| Reset Sampler | Sends a reset signal to your autosampler. During the reset, the injector is in a Not Ready state (yellow). |
| Release Vial | Moves the gripper arm to the front, outside the vial tray and releases the vial from the gripper arm. |
| Switch On | Switches the autosampler thermostat on. |
| Switch Off | Switches the autosampler thermostat off. |
| Switch Valve to Bypass | Switches the valve from the main flow path to bypass. |
| Switch Valve to Mainpass | Switches the valve from bypass to the main flow path. |
| Switch on/off Tray Illumination | Switches the tray illumination on or off. |
| Modify | Temperature Mode Displays the sampler's Modify Temperature Mode dialog box, which allows you to switch between Constant temperature mode, with control from the Control parameters, and Variable temperature mode, with control from the Method Setup parameters. Use Constant temperature mode to store samples at a constant temperature across multiple runs. This is the default mode, which is recommended in most cases. In Variable temperature mode, the temperature can be varied from run to run. |


base-id: 3270146699
id: 27021601034369675