Editing Pane
The Editing Pane shows the report items which are part of the report template. In the Editing Pane, you design the report template.
What do you want to do?
Margins
The area shown in the Editing Pane already considers the margins configured in the report properties. When you generate the report, RTE will automatically add these margins. A gray area in the Editing Pane indicates an area that exceeds the given page size.
Sections
The editing pane is divided into three sections:
Header: You can change the height of this section by dragging the Body bar. You can show/hide the section by clicking
 in the toolbar.
Body: You can change the height of this section by dragging the Footer bar.
Footer: You can change the height of this section by dragging the bottom border of the Footer section. You can show/hide the section by clicking
 in the toolbar.
In addition, you can adjust the page width by dragging the right page border. If the new page width is too small for all report items to be printed, the area that cannot be printed is shown with a light gray background.
Grid
On the Editing Pane, a grid is displayed to help you align the report items. You can change the Grid Properties by clicking  in the toolbar.
You can change the position of the report items using the mouse or the arrow keys. The report items are then moved either continuously or stepwise, depending on the Align To Grid setting. You can activate the Align To Grid mode by clicking  in the toolbar.
Context menu of report items
The context menu of all report items contains the following items:
|
Align To Grid |
Align the currently selected report item or items to the grid. |
|
Align |
If you selected multiple report items, you can align these items to the first selected item. This command is only active if either none of the selected items are inside a composite group, or all selected items are within the same composite group. |
|
Make Same Size |
If you selected multiple text fields or data fields, you can set the width, height, or both for all selected items to the size of the first selected field. With the Size To Grid option, you change the width and height of all selected items so that they fit in the grid. This option is only available if the grid is shown. |
|
Horizontal Spacing |
If you selected at least three text fields or data fields, you can distribute the selected items horizontally, that is, the horizontal space will be equal between the selected items. This command is only active if the items are already horizontally aligned, and either none of the selected items are inside a composite group or all selected items are within the same composite group. |
|
Vertical Spacing |
If you selected at least three text fields or data fields, you can distribute the selected items vertically, that is, the vertical space will be equal between the selected items. This command is only active if the items are already vertically aligned, and either none of the selected items are inside a composite group or all selected items are within the same composite group. |
|
Group |
Group the selected items. This command is only active if the selection contains more than one item. |
|
Ungroup |
Ungroup the items in the selected group. |
|
Move |
Changes the cursor to
|
|
Delete |
Delete the currently selected item from the report template. |
|
Lock |
Lock the item to protect it from any further modification. Locked items cannot be changed or deleted, they can only be moved. This command is only active if you have the required privilege. Privileges are configured in the Control Panel. |
|
Unlock |
Unlock a locked item. This command is only active if you selected a locked item and if you have the required privilege. Privileges are configured in the Control Panel. |
|
Properties |
Open the Properties dialog of the currently selected report item. |
 . Click the new location in the
Editing Pane to move the item there.
. Click the new location in the
Editing Pane to move the item there.The context menu of tables contains the following additional commands:
|
Insert Column to Left |
Insert a new table column to the left of the selected column. |
|
Insert Column to Right |
Insert a new table column to the right of the selected column. |
|
Delete Column |
Delete the selected column. |
The context menu of composite groups contains one additional command:
|
Save Composite Group |
Save the composite group under a specific name. The group is then listed in the Report Items browser under the Composite Groups category, so you can reuse it in other templates. |
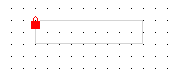
Locked report items
For locked report items, you can only view the properties or move the report item. When selected, locked report items have a small red lock icon at the top left corner:
Subpages
See Also
base-id: 11030184203
id: 36028808049148171