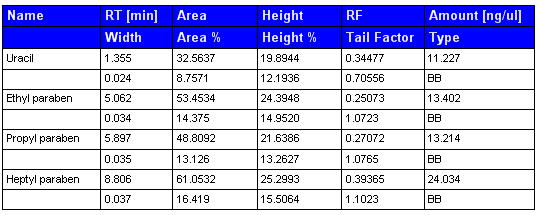
Create a second table row
To create a second row in the table header
-
In the Table Properties, select the Columns page.
-
Under Multiple Table Rows, select the Enable Additional Header Row check box.
-
Select the column for which you want to set the heading, and click Column Properties.
The Column Properties dialog opens.
-
On the Value page, provide a header text for the second header row in the Additional Header Text field.
-
On the Header Format page, configure the format of the table header.
Both header rows will have the same format.

To create a second row in the table details
-
In the Table Properties, select the Columns page.
-
Under Multiple Table Rows, select the Enable Additional Detail Row check box.
-
Select the column for which you want to set the heading, and click Column Properties.
NOTE
We recommend using only one table details row for the first column, and adding a second table row only to the other columns. This will make it easier to identify the table rows belonging to each other in the generated report.
The Column Properties dialog opens.
-
On the Value page, provide an expression for the second detail row in the Additional Value field.
-
On the Value Format page, configure the format of the two detail rows.
The basic formatting will be the same for both detail rows. You can, however, set a different number format for each detail row.
-
On the Summary Calculations page, you can configure specific summary calculations for each detail row. From the drop-down list, choose the detail row that you want to configure.
However, for a better overview of the results, we recommend creating a summary calculation only for one specific detail row.
-
On the Conditional Formatting page, you can format each detail row separately. From the drop-down list, choose the detail row that you want to configure.

base-id: 11030678667
id: 11030678667